Create App By using Napa Office 365 Development Tool. Complete Step by Step

Tuesday, October 2, 2012


basic operations using the JavaScript client object model in SharePoint 2013 Preview. Create,Delete Items.

Napa
The “Napa” Office 365 Development Tools make it easy to start building apps for Office and SharePoint without leaving your browser or installing software. Just add the “Napa” Office 365 Development Tools app to your SharePoint Online Developer Site, launch it, and you will be ready to create your first app for Office or SharePoint.

When you are ready to leverage the powerful capabilities in Microsoft Visual Studio 2012, the “Napa” Office 365 Development Tools makes it easy to download your project, get the required software and continue developing your app for Office or SharePoint.


Sign up for an Office 365 Developer Site 
Sign up for a trial during the preview period.

Step by Step how to Sign Up @ Office 365 Developer Site

 Once Create Account on  Office 365 Developer Site  you will see Office 365 Admin Center page.

Installing and Configring Napa App with Dev Site

1. Goto SharePoint>Administration Center>Apps>Purchaes App


2. Search and Select Napa Office 365 App form SharePoint App store and  Click on ADD IT button

3. Click on Return to Site button. Might be it will take few mints.

Create Developer Site to enable NAPA APP FOR DEVELOPMENT FEATURE 


4.Go back to SharePoint Administration Center then Click on Site Collection on left Menu .then Add new Site in as Private site.
SharePoint Administration >Site Collections>New>Private Site Collection


4. Select Developer Site Template form new site collection list. than fill basic info and Press OK button.


6.Once you Complete Creation of Site Collection you will see Develoepr site with new url in your site collection list then go to your developer site


7.then Click on top setting Icon>Add App and Select Napa App


8.Click on Trust it button

9. Napa Start up Screen will appear with three options Select App for SharePoint and mention your App name 


Once you Click on Create button you will See Napa Console on browser.


Guide for Napa 


10.then on your left hand site panel you will see treeview. select Pages>Default.aspx and Modify the Content PlaceHolder called PlaceHolderMain with Following Code example (code file are give blow).


11.Add this Code under PlaceHolderMain ContentPlaceHolder


12.in Left Menu Click on Script section and select App.js  and Add Code under the SharePointReady Function

13.add this code for bind click events of  three button that we add in default.aspx page.


14.Add these Functions end of the App.js File


15.then on > Play Icon from bottom bar. and deploy and launch the App

16.if App will not open automatically kindly check your browser might block the popup window.


17 Test App Add list Delete list ,Get list Count in web Operation


Add Code and Controls for Adding  and Deleting List Items.

18.Go back to Default.aspx and Find Selectionlistbox and add Onchange event with getitem method 


19 Add this Code under Selectionlistbox for Creating Items and Deleting them
20  Go to Script >App.js Again and add the following Code under the SharePointReady Fuction


End of the App.js file Add this Following code Step by Step


then Publish you app Again with Play icon on bottom it will upload and update your app again

Launch App Again
Test All Operation that you Create by Code


Open Compete Project in Your Visual Studio by Click on Visual Studio Icon on Bottom bar


Download Source Code


By Usama Wahab Khan

Fixed ribbon and scroll bar issues.

Monday, October 1, 2012

The new Ribbon functionality in SharePoint 2010 can cause some frustration when creating custom master pages. The trick is to develop a master page with the ribbon always on top of your page without losing functionality and keep the content scrolling working correctly. Sometimes the scroll bars seems to grow outside the browser window leaving the end-user unable to scroll to the bottom of the page. Chances are that you forgot some HTML in the master page.

Source : Read Full Article 


Create Nintex Workflow With SharePoint2013 Publish your Artcile Link on your Facebook Wall

Nintex Workflow was really famous in moss 2007 and SharePoint 2010. In SharePoint 2013 with New App Model Nintex Workflow. you can add Nintex Workflow App to your Site Collection. 


Sign up for an Office 365 Developer Site
Sign up for a trial during the preview period.

Step by Step how to Sign Up @ Office 365 Developer Site

 Once Create Account on  Office 365 Developer Site  you will see Office 365 Admin Center page.


Go to SharePoint 

Go on SharePoint Central Administration Penal and where you can see by default one  Public  Site.

ON Left menu  select App > and Click on Purchase Apps. 


Select  Nintex Workflow form SharePoint App Store.


Go to your Public Site and Click View Site Contents form top menu 

Click on Add an App form Top Menu

Select the Nintex App 

Click on Trust It


Go Back to Site Contents. and Double Click on list called "Posts"


Click on Nintex Workflow form Ribbon on top
Select Design a workflow option form Popup start Screen
Click on Settings from Top. Mention workflow name and select start on create form start options

Find Facebook Action form Last Menu Search options. and drag and Drop to screen


Double Click on Facebook Action it will show you the Popup where you have to mention credential for facebook and email account. 


Click on Publish 


it will take few moment to validate your workflow.


Nintex will send you the email to authorized your email Address
 click on authorization link


Create a Post :)


Enjoy :)

by Usama Wahab Khan


Visual Studio 2012 New Feature MY Work

Wednesday, September 26, 2012


Visual Studio 2012 help developer to focus on what is Important by using New Features in Team Explorer Called “MY Work”. Normally when we are doing some new development in Visual studio. We open multiple windows, breakpoint for the debugging current scenario. Sometimes mid of development we get very urgent. Like some bug fix.  For that you have changed the whole context. To compile and debug   code for bug fixing. Change context it’s really such great Problem me.  Because to change my context of the work I have to close all current working windows and remove all breakpoints and commit the uncompleted code in Visual Studio.  And it’s such a waste of time and developers Productivity.  But in new Microsoft Visual Studio 2012 has a new feature called “My WORK”.
If you’re using Visual Studio Premium or Visual Studio Ultimate you can use My Work Page in Team Explorer.  Just Clicking on “Home Icon”

In My work page you will three major Sections
In Progress Work
By just drag and drop your work item you can track all associated with this task automatically.


 Suspended work

You save current Work State. Like all breakpoints and open windows uncompleted Source Code. And resume it later to start from the same state. It’s just like Pausing IED. 


 Available work items
All tasks which Assign by Team to you. On Agile board by using the TFS Agile Template.  Automatically will appears in here. And when you just drag them into In Progress work automatically IT start’s tracking of all code Changes and Associated with this task. And that your team can monitor form agile board.
And you Team Member can also check all Code Changes in browser with side by side comparison.  
 Code Reviews and Requests
 In visual studio 2012 you can improve your code quality and reduce the risk. By using Code Review or Requests.  You can Request your team member to review your code or test and helps you to solve the problem. And another team member can receives Code Review Requests and they can respond their idea and Point of view by test or code. The requester has right to accept these code changes or reject them.


Reference :
http://msdn.microsoft.com/en-US/library/hh474795
http://msdn.microsoft.com/library/ms245462(v=vs.110)#my_work

By : Usama Wahab Khan

The Visual Guide for Building Team Foundation Server 2012 Environments

Tuesday, September 25, 2012

MEA ALM Community is an independent & non -profit community, dedicated to supporting and educating Microsoft Application Lifecycle Management tools and technologies. The key mission of our community is to provide a strong and vibrant community for the different roles involved in software development and delivery to enable them build better software!


Watch the Videos

This Guide comes with 38 videos that explain all scenarios in a step-by-step manner.

Parts

Part 1- Introduction & Overview
Part 2 - Creating & Preparing the Required Infrastructure
Part 3- Installing and Configuring Team Foundation Server Pre-requisites
Part 4- Installing and Configuring Team Foundation Server
Appendices

Chapters

Part 1- Introduction & Overview

  • Chapter 1: Introduction
  • Chapter 2: Architecture & System Requirements

Part 2 - Creating & Preparing the Required Infrastructure

  • Chapter 3: Creating & Preparing the Domain Controller
  • Chapter 4: Creating & Preparing the TFS Infrastructure Physical Machine (Hyper-V Host)
  • Chapter 5: Creating & Preparing the Team Foundation Server Virtual Machine

Part 3- Installing and Configuring Team Foundation Server Pre-requisites

  • Chapter 6: Installing & Configuring SQL Server 2012
  • Chapter 7: Installing & Configuring SharePoint Server 2010
  • Chapter 8: Configuring SharePoint Server 2010 for Dashboard Compatibility

Part Part 4- Installing and Configuring Team Foundation Server

  • Chapter 9: Installing & Configuring Team Foundation Server 2012 
  • Chapter 10: Configuring the Team Build Service
  • Chapter 11: Configuring the Enterprise Application Definition

Appendices

  • A. Creating Local Service Accounts and Groups for Windows Server 2012 
  • B. Installing Hyper-V Role on Windows Server 2008 R2
  • C. Adding .NET 3.5 Framework feature for Windows Server 2008 R2
  • D. Configuring SQL Server 2012 Analysis Services Port
  • E. Configuring SQL Server 2012 Database Engine Port
  • F. SQL Server 2012 Installation Verification  
  • G. SharePoint Server 2010 SP1 Installation Verification
  • H. Team Foundation Server 2012 Installation & Configuration Verification

Videos

    Team


    Reference 
    http://tfs2012visualguide.codeplex.com/

    Most Important Design Patterns for SharePoint developer

    Friday, September 21, 2012


    A design pattern approach in SharePoint development is very important for standard and  reusable Solution for most common problems in software development. A design pattern is not only for implementation of code. its solution template to solve real life Programmatic Problems.  adopting design pattern approach to develop solution for SharePoint    that allows you to formulate a high level Solutions that is independent of the implementation details.


    Most Common Design Pattern for SharePoint Development.


    • Model-View-Presenter (MVP)
    • Repository
    • Service Locator
    • The Trusted Façade Pattern

    Model-View-Presenter (MVP)


    As UI-creation technologies such as ASP.NET and Windows® Forms become more and more powerful, it's common practice to let the UI layer do more than it should. Without a clear separation of responsibilities, the UI layer can often become a catch-all for logic that really belongs in other layers of the application. One design pattern, the Model View Presenter (MVP) pattern, is especially well suited to solving this problem.


    In SharePoint
    A Web page or Web Part in a SharePoint application contains controls that display application data. A user can modify the data and submit the changes. The Web page or Web Part retrieves the data, handles user events, alters other controls on the page in response to the events, and submits the changed data. Including the code that performs these functions in the Web page or Web Part makes them complex, difficult to maintain, and hard to test.


    Repository

    Repositories act as mediators, or interface layers, between different parts of an application. The Training Management application uses repositories to manage persistence of information. The Training Management repositories are responsible for querying SharePoint and for updating SharePoint list items.

    Retrieving data from SharePoint lists requires careful use of the SharePoint API, knowledge of the GUIDs related to lists and fields, and a working knowledge of Collaborative Application Markup Language (CAML). The Training Management Web forms, event receivers, and workflow business logic all require access to the Training Management lists. In the original version of the application, the list access logic was scattered throughout the application. To correct this problem, the application now centralizes the list access logic in repositories. Repositories simplify the access to list data and provide a layer of abstraction that makes unit testing with mock objects much easier.

    Mostly SharePoint applications,  the business logic accesses data from data stores such as SharePoint lists, or Web services. Directly accessing the data can result in the following:

    • Duplicated code
    • A higher potential for programming errors
    • Weak typing of the business data
    • Difficulty in centralizing data-related policies such as caching
    • An inability to easily test the business logic in isolation from external dependencies
    Use the Repository pattern to achieve one or more of the following objectives:

    • You want to maximize the amount of code that can be tested with automation and to isolate the data layer to support unit testing.
    • You access the data source from many locations and want to apply centrally managed, consistent access rules and logic.
    • You want to implement and centralize a caching strategy for the data source.
    • You want to improve the code's maintainability and readability by separating business logic from data or service access logic.
    • You want to use business entities that are strongly typed so that you can identify problems at compile time instead of at run time.
    • You want to associate a behavior with the related data. For example, you want to calculate fields or enforce complex relationships or business rules between the data elements within an entity.
    • You want to apply a domain model to simplify complex business logic.

    Interactions of the repository

      Interactions of a SharePoint list repository
     
    Using the Repository pattern in a SharePoint application addresses several concerns.

    SharePoint applications often store business information in SharePoint lists. To retrieve data from SharePoint lists requires careful use of the SharePoint API, knowledge of the GUIDs that are related to the lists and their fields, and a working knowledge of CAML. Repositories centralize this logic.
    The amount of code that is required to query or update a SharePoint list item is enough to warrant its encapsulation into helper methods. When Web Forms, event receivers, and workflow business logic all require access to the same lists, the code that accesses the SharePoint lists can be duplicated throughout the application. This can make the application prone to bugs and difficult to maintain. Repositories eliminate this duplication.
    Without a repository, the application is difficult to unit test because the business logic has direct dependencies on the SharePoint lists. Repositories centralize the access logic and provide a substitution point for the unit tests.
    Components of a SharePoint list repository
     

    Reference 

    Service Locator

     A service locator provides a centralized point for registering and looking up different objects. Service location is a useful way to hide the specific implementation of a service from the consumer of that service. For example, in the Training Management application, a Web Form may need to use a human resources (HR) management service, but it does not require information about how the service is implemented. It simply accesses an instance of that service. Service location is a common feature of dependency injection containers such as the Unity Application Block, the Castle Windsor Container, and the StructureMap dependency injection framework. The Training Management application implements a simple service locator, without the features of a full dependency injection container, such as cascading dependency resolution, lifetime management, and property/constructor injection.

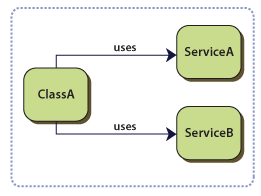
    You have classes with dependencies on services whose concrete types are specified at compile time. In the following example, ClassA has compile time dependencies on ServiceA and ServiceB. The following diagram illustrates this.

    This situation has the following drawbacks:

    To replace or update the dependencies, you must change your classes' source code and recompile the solution.
    • The concrete implementation of the dependencies must be available at compile time.
    • Your classes are difficult to test in isolation because they have a direct reference to their dependencies. This means that these dependencies cannot be replaced with stubs or mock objects.
    • Your classes contain repetitive code for creating, locating, and managing their dependencies.
    • The next section describes how to address these issues.

    Use the Service Locator pattern to achieve any of the following objectives:

    You want to decouple your classes from their dependencies so that these dependencies can be replaced or updated with little or no change to the classes.
    You want to write logic that depends on classes whose concrete implementation is not known at compile time.
    • You want to be able to test your classes in isolation, without the dependencies.
    • You do not want the logic that locates and manages the dependencies to be in your classes.
    • You want to divide your application into loosely coupled modules that can be independently developed, tested, versioned, and deployed.
    How classes use a service locator
      

    http://msdn.microsoft.com/en-us/library/ff648968.aspx

    The Trusted Façade Pattern
     You want to authenticate external users that access a client application. Both the users and the application are outside the corporate firewall. The application is in the perimeter network (also known as DMZ, demilitarized zone, and screened subnet). It uses a Web service that is behind the firewall, in the corporate network. The application and the Web service also use different credential stores and authentication mechanisms. The following diagram shows the network topology.

    Topology of the network
     

    Use the Trusted Façade pattern with a SharePoint application to do the following:

    • Authenticate external users of a SharePoint application that is located in a perimeter network. The SharePoint application uses a credential store that is also in the perimeter network.
    • Authenticate the SharePoint application in a perimeter network to a Web service in the corporate network with credentials that are recognized in the corporate security domain.
    • Ensure the confidentiality and integrity of messages that are exchanged between the SharePoint application and the Web service.
    • Have a Web service in a corporate domain apply authorization rules that are based on the identity of the external user.
    • Avoid creating additional credential stores to store passwords in the SharePoint application.
              Trusted façade security layers


    Reference 


    -----------------------------------------------------------------------------------------------------------
    Reference